skip to main |
skip to sidebar
Open your refrigerator. Go ahead, seriously. Now move aside the mayonnaise, the milk, the orange juice and anything else you bought in the last week and peer into the depths. Most of you probably do so with at least mild trepidation, if not outright terror. For some of you, Dirk Gently's lurking fridge might come to mind. Now I'm not suggesting you eat the potatoes that are not only eyeing you back but making threatening gestures as well. Nor am I saying you should cook with the green beans that are now blue with orange polka-dots and dancing the aforementioned polka. Rather, after you've thrown out all of the things that are funny colours, past their expirations, uncomfortably squishy, or trying to climb out of the bowl, you can probably find enough in the corners to make something like this: What is it? Bread pudding, though in this case made with stale cheddar cheese biscuits, baby potatoes, onion and carrots. And it is f***ing delicious! Bread pudding can be made either savory or sweet, and is really easy. All you really need is milk, eggs, and stale bread. The base is simple enough that you can do most anything with it, dependent on the type of bread. In this savory case, I added oregano, marjoram, paprika, sage, white pepper, and a little bit of tumeric (careful, it's strong stuff.) And a little cheese, which is almost never bad.
It comes out rich and warm - good winter food - and this one tasted a little like popovers, though with onion warmth and a little prickliness and tartness from the herbs. I ate some of it an hour ago, and I'm really looking forward to eating it for lunch tomorrow!
BREAD PUDDING
Basic Ingredients:
Stale bread (if not stale, toast a bit)
4 Eggs
2 C Milk
My Recipe adds:
1 Large Handful Onion, diced
1 Large Handful Carrots, chopped
1 Large Handful Potatoes (round fingerlings, unpeeled)
2 T Goat Cheese (fresh, herbed)
1 T Oregano (dry)
1 T Marjoram (dry)
1 T Paprika (smoked)
1 T White Pepper
1/2 t Tumeric
1/2 t Sage
1. Crumble bread in large chunks into an 8-inch square baking pan until about 2/3 full. (Preheat oven to 350°F, too.)
2. Add the vegetables and mix with the bread to distribute evenly.
3. Whisk eggs, milk, herbs and spices and pour over the bread mixture.
4. Let soak for a few minutes - make sure all the bread gets moist.
5. Bake at 350°F for 40 minutes (until knife comes out clean.)
6. Raise heat to 500°F for 5 minutes to brown and crisp up crust.
7. EAT!
Rats are cute. Ok ok, not always - like the nutria running around the docks or the rats that peer with little red beady eyes from the dumpster in the alley - but for those who doubt, please see here. Or watch the movie Ratatouille - a fabulous movie for a bunch of reasons: silly, heartwarming, contains cute rats, and is almost wholly and entirely devoted to the subject of food. I'll stay away from the philosophical discussions engendered by the movies many characters and events for the time being, if only becasue such things are best discussed over a hearty meal and then a full belly.
 As the title would foreshadow, the denoument of the movie centers on the preparation of Ratatouille, for which I found myriad different recipies online. That should surprise nobody, as it seems that, for many common French dishes or foods, ownership or origin is hotly debated by those who wish to claim ownership of the true dish (or drink, in the case of pastis, absinthe, etc.) Like in any traditional food, typically everyone's grandmother was the originator of the best version, which, of course, was only made possible by the decscent of both the recipe and the grandmother from the original creator of the dish in the first place. I'm sure the same is true for many recipes for ratatouille, though at least Wikipedia seems quite clear about the origins of the dish in the area of France now known as Provence.
 Interestingly, both the version used in the movie (developed by Chef Thomas Keller of the French Laundry restaurant) and most of the recipes I could find which were attributed to other chefs are based on a version of the dish that branched off from tradition in the 1970s with the creation of "cuisine minceur" by French chef Michel Guérard. Cuisine minceur is basically a more delicate, and generally lower-calorie, approach to the recreation of many dishes and the invention of new ones. Where it applies to ratatouille is in the fact that the more delicate preparation of ingredients gives both a more delicate texture and also a more richly interwoven flavour. Guérard published a minceur adaptation of ratatouille in his book (linked above) and gave the dish the name "confit bayaldi."
For the movie, Chef Keller adapted confit bayaldi back towards the more traditional ratatouille ingredients (Guérard had added mushrooms in place of peppers) and made some additions to the finishing and presentation. He also tweaked the name to "confit byaldi." And so was born the most recent, movie-star version of the old-school, peasant-farmer stew. There's just one problem when you try to make it in your own kitchen: it takes forever to prepare and cook! Here's the recipe (via the New York Times - seemed like the most reliable source.) So, all deference due to Chef Keller, I wanted to make the recipe a little quicker but with an equivalent result - a bit more accessible for the everyday. I think I succeeded, though the only way to know for sure would be if he consented to come to dinner for a taste...
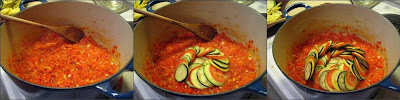 The recipe, namely the ingredients and basic preparation, I did not change. I minced the required minceables and sliced the required slicees. However, I peeled none of the vegetables, nor did I pre-roast the peppers. I discovered, too, that tomatoes and Japanese eggplant do not mandoline well, so those were a little time-consuming to slice so thinly. (Actually, the most time was taken in the slicing of all the vegetables while the cooking effort involved is quite quick.)
The recipe calls for preparation of a baking dish in which the sliced vegetables are slowly steamed as the "piperade" is heated by the dish in the oven. This steaming can take several hours, which I did not have. I wanted a one-pot, one-hour version. I used an enameled dutch oven as my one pot. And instead of cooking the piperade until it was super-thick and then adding it to the baking dish, I cooked it stovetop in the dutch oven and took it off the heat while a little liquid still remained. I layered the sliced vegetables in the requisite spiral, packing them tightly, and then put the pot (covered) back on the stove. By cooking stovetop, I accomplished both the further stewing and reduction of the piperade and also the start of steaming the vegetables at the same time.

I preheated the oven to 350 and transferred the pot in after 15 minutes or so (the vegetables were starting to glisten.) I roasted for a further 30 minutes covered, and then uncovered to evaporate the excess liquid, as is also instructed in the recipe, and to slightly brown the top, which is not. And then since it was a potluck among friends, I served it in the pot with a big spoon - so much for plating and presentation, though everyone did get to see the big beautiful spiral!
 Frankly, it was delicious. I did not expect a dish made from such simple ingredients in such a straightforward manner to taste so deeply and richly satisfying, with both a little spiciness and also a depth of flavour that did not translate into a weight on neither the palate nor the stomach. I'm sure the things I did differently had an impact on both flavour and texture. For instance, I think unpeeled, unroasted peppers would be brighter and grassier, and perhaps a little tart in comparison to ones prepared as instructed and by steaming for a long time at low heat the texture of each vegetable slice likely stays firmer and gets smoother as the cellular structure disintegrates more evenly and gently. But it was still great. I look forward to trying other variations on the theme, though for moment let this recipe hold you over:
RATATOUILLE à la RATATOUILLE
Confit Byaldi à la Chef Thomas Keller, via the New York Times
Variations à la Lavender Moose (in italics)
FOR PIPERADE:
1/2 red pepper, seeds and ribs removed
1/2 yellow pepper, seeds and ribs removed
1/2 orange pepper, seeds and ribs removed
2 tablespoons extra virgin olive oil
1 teaspoon minced garlic
1/2 cup finely diced yellow onion
3 tomatoes (about 12 ounces total weight), peeled, seeded, and finely diced, juices reserved
1 sprig thyme
1 sprig flat-leaf parsley
1/2 a bay leaf
Kosher salt
FOR VEGETABLES
1 zucchini (4 to 5 ounces) sliced in 1/16-inch rounds
1 Japanese eggplant, (4 to 5 ounces) sliced into 1/16-inch rounds
1 yellow squash (4 to 5 ounces) sliced into 1/16-inch rounds
4 Roma tomatoes, sliced into 1/16-inch rounds
1/2 teaspoon minced garlic
2 teaspoons olive oil
1/8 teaspoon thyme leaves
Kosher salt and freshly ground black pepper
FOR VINAIGRETTE
1 tablespoon extra virgin olive oi
1 teaspoon balsamic vinegar
Assorted fresh herbs (thyme flowers, chervil, thyme)
Kosher salt and freshly ground black pepper.
1. For piperade, heat oven to 450 degrees. Place pepper halves on a foil-lined sheet, cut side down. Roast until skin loosens, about 15 minutes. Remove from heat and let rest until cool enough to handle. Peel and chop finely.
I didn't bother with the roasting because I was trying to be speedy. I might try it next time to see what a difference it makes.
2. Combine oil, garlic, and onion in medium skillet over low heat until very soft but not browned, about 8 minutes. Add tomatoes, their juices, thyme, parsley, and bay leaf. Simmer over low heat until very soft and very little liquid remains, about 10 minutes, do not brown; add peppers and simmer to soften them. Season to taste with salt, and discard herbs. Reserve tablespoon of mixture and spread remainder in bottom of an 8-inch skillet.
I did this as advertised, with the exception of retaining a little more liquid in the mixture by not heating it as long.
3. For vegetables, heat oven to 275 degrees. Down center of pan, arrange a strip of 8 alternating slices of vegetables over piperade, overlapping so that 1/4 inch of each slice is exposed. Around the center strip, overlap vegetables in a close spiral that lets slices mound slightly toward center. Repeat until pan is filled; all vegetables may not be needed.
Yes! This is the fun part :-) I wound the slices a little tighter to pack more in until they were almost standing up. I had a bunch of leftovers that went into a really good pasta/pizza/couscous sauce later in the week.
4. Mix garlic, oil, and thyme leaves in bowl and season with salt and pepper to taste. Sprinkle over vegetables. Cover pan with foil and crimp edges to seal well. Bake until vegetables are tender when tested with a paring knife, about 2 hours. Uncover and bake for 30 minutes more. (Lightly cover with foil if it starts to brown.) If there is excess liquid in pan, place over medium heat on stove until reduced. (At this point it may be cooled, covered and refrigerated for up to 2 days. Serve cold or reheat in 350-degree oven until warm.)
Significant cooking variations: put the dutch oven back on the stovetop and cover and cook on low (simmering only!) for about 15 minutes. Then transfer into 350-degree oven for 30+ minutes (check after 30 minutes to see if vegetables are cooked but "al dente". If so, uncover and cook for 10 minutes or until most liquid is evaporated and top is slightly brown (short-cut to step 6 below.)
5. For vinaigrette, combine reserved piperade, oil, vinegar, herbs, and salt and pepper to taste in a bowl.
6. To serve, heat broiler and place byaldi underneath until lightly browned. Slice in quarters and very carefully lift onto plate with offset spatula. Turn spatula 90 degrees, guiding byaldi into fan shape. Drizzle vinaigrette around plate. Serve hot.
Serve in cooking pot with a big spoon and vinaigrette on the side.
Note: Facts, names, dates, etc. in this post sourced from Wikipedia, the New York Times, and michelguerard.com.
So I had this idea: I like to cook, I like to feed people, I like making up recipes just to see what happens, and I like talking about these wacky recipes with the people I am feeding while we are all in the middle of eating said funky foodstuffs. In other words, I decided to invite a few people over to be guinea pigs to my mad culinary experiments. And I am truly flattered that they agreed to come and did so with with high expectations. But enough about the idea, on to the food. How's this for a meal? (Delicious photos by Smita.)
I started with a risotto - but one based entirely on basic Japanese ingredients. Instead of using olive oil to saute and brown the rice, I used sesame oil. Instead of vegetable or meat stock I used a broth from smoked bonito, sardine, and kelp with some white miso paste for texture and flavour depth and a little bit of ginger. Instead of wine I used mirin. The vegetables were kabocha squash and shiitake mushrooms. And to garnish, black sesame seeds, super-finely sliced shiso, and soy sauce. I still used arborio rice for texture, and I also used a very little cheese to hold it together - a very light-flavoured hard Mahon.
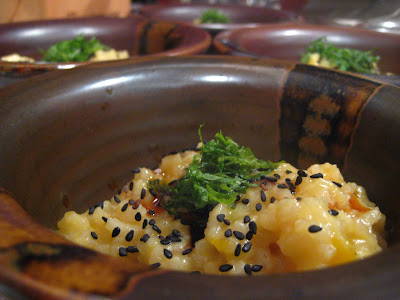 The entire recipe was my attempt at a sort of macro-scale fusion recipe. I wanted to see if the texture of risotto could be successfully combined with entirely Japanese flavour. I'm excited that the result is a resounding "yes!" The mouth-feel of this experiment was exactly the same as my more traditional risotto recipes, but the taste was of a sweet miso-mushroom soup with the umami of soy, toasty overtones of sesame, and sweet earthy bites of squash. The greatest, yet most subtle, change was definitely the liquids. It was hard to really identify how the fish stock and miso differed from chicken or vegetable stock, but the effect on the final dish is great. I think the european-style stocks have much more onion, carrot, garlic, and savory herbs than their Japanese counterparts. Mirin is also worlds apart from white wine - much sweeter and with slightly beery flavour. I think that's why the dish came out sweet - next time I'll use less.
Making this dish gave me a great excuse to go to Uwajimaya, the glorious Japanese supermarket. Since I don't read Japanese, figuring out which is the right dried soup base to use and how to use it, or which miso paste is which, is always fun - involving deciphering packaging diagrams and finding numbers in the directions from which to interpret measurements, timing, and whether something might kill you if eaten wrong.
The second course was a pork tenderloin, rubbed with a paste made from cocoa nibs from Theo Chocolate, wild peppercorns, sugar, olive oil, sage, paprika, and cumin. I ground the spices and chocolate with a mortar and pestle, adding a little olive oil at a time until the paste became the consistency of a dense chocolate mousse. Plain, the mixture tasted tart and nutty, with a little heat from the paprika and pepper and some dusty warmth from the sage. Rubbing it on the pork smelled like paprika and chocolate. Baking it smelled like cumin plus some sweet smoke. And eating it was a very mild nutty aftertaste to the pork, which I slightly overcooked. It looked really good, but wasn't as richly flavoured as I'd hoped. Perhaps marinating in the rub overnight would have allowed the flavours to penetrate and develop. So the verdict: tasty, but a little mundane.
 The accompaniment to the pork was shaved par-boiled golden beets with sea salt, pepper, and truffle oil. Boiling the beets made them not quite so crunchy, but I kept some firmness by not boiling too long and then immediately chilling the beets in cold water. Shaved vegetables are fun to arrange because they are so malleable and delicate. These came out looking like fluffy yellow roses on the plate. And they tasted sweet and grassy at the same time - the salt magnifying the sweetness, the pepper adding a little tart twinge, and the truffle oil smoothing out the texture and rounding out the taste. I also used some leftover shiso to garnish this plate, and the shiso went surprisingly well with the beets - a cool and herbal complement to the sweetness of the beet.
The next course was dumplings (ravioli, really) of goat cheese, carrot, and onion. I grated the carrot and onion with the brilliant multi-purpose "Kitchen Mama" tool I got at Daiso. This grater produces basically a rough paste of anything put to it (including knuckles, I'm sorry to say.) When you pulverize vegetables to such an extent, lots of the liquid comes out. As I didn't want the filling to be watery anyway, I used a looseleaf tea bag to squeze off all excess moisture. Cheesecloth would work, too, but more stuff sticks to it and the tea bag was already a convenient pouch-shape. Note, as well, that when you grate onion it's that much more potent - whew! I mixed the drained carrot and onion with plain fresh goat cheese and a little salt and pepper.
 As wonderful as it is to hand-make dumpling skins, this is where I decided to cut a corner. I found, after much searching, locally-made, freshly-packed shu-mei skins that did not contain all of the preservatives and stabilizers common to nationally-distributed ones. They're basically just a delicate circular noodle. You put a bit of filling in the middle, run a wet finger around the edge, fold in half, and press opposite edges together to make a little fat half-moon. Honestly, you could put anything in them (and I intend to try!) I fried the finished dumplings in canola oil though you can steam them, too. Shu-mei skins are very delicate so these were finished quickly - puffy, crisp and golden once I finally got the oil temperature right. Next time I'll use a thermometer so I can tell you what "right" really was, though I'm sure you can find lots of frying info online. There wasn't actually much taste of carrot, despite the amount I used. The cheese was dominant, with a little onion and a little sweetness reminiscent of fresh carrot juice.
Sponge candy was completely unknown to me until I started looking for a way to reproduce the core of the Whopper. No, not the hamburger - that I can do. I mean that mysteriously crisp and malty candy covered in chocolate. There are al sorts of approximations out there, but the one that seems to hold the most promise is sponge candy. As I mentioned, I'd never heard of it, but when I told my mother she exclaimed, "Oh yeah, like honeycomb. I love honeycomb! Oh, can we please make some when you come home for Thanksgiving?!" So it appears I missed something. That, or it was popular in the 1950s. Likely the latter, since candymaking is something of a vanishing art.
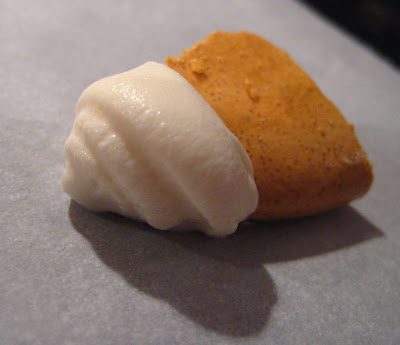
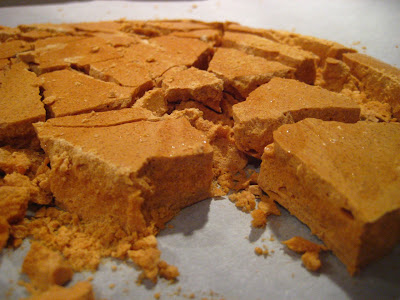 It is very simple: sugar, vinegar, and baking soda. Remind anyone of science-project volcanoes? When you mix the baking soda into the vinegar-primed melted sugar, and stir like crazy, you get lots of little expanding bubbles trapped in the sugar. When you pour out the sugar into an oiled baking dish and let it cool, it hardens into a delicate, crunchy sugar matrix (that you break apart by hitting it with a hammer!) To get it malty, I added malt powder mixed with the baking soda. Malt powder is basically another type of dried, crystallized sugar (maltose, among a few others.) But it has that very distinctive flavour (of Whoppers!) Suffice to say, I, too, ow love sponge candy, especially malted. I'm going to try another batch with more malt and also using the recommended half-sugar-half-corn syrup mixture (which should enable me to get the molten sugar to hard-crack temperature with less browning and also enable a lighter, fluffier candy when hardened.) But still: yum!, especially when dipped in leftover cream cheese frosting from birthday-cake adventures.
 Last of the evening was a nightcap. A fabulous bar called Knee High Stocking Company makes a drink called the "St. James Cooler" that is a mixture of Jameson whiskey, St. Germain elderflower liqueur, lemonade, mint, and soda. I've had it. It is delicious and refreshing. And it inspired me to try a similar concoction, though a calmer version. I mixed 1 measure Powers' Whiskey, 1/2 measure Extra Dry White Vermouth, 2 Tablespoons elderflower concentrate ("Fladersaft" from Ikea, of all places), and a dash (1/8 tsp) lavender vodka that I made last year. More on the vodka some other time. Shake up that mixture with ice and serve neat. Refreshing and relaxing at the same time. I think it could be good both before and after dinner.
So that was the feast. I loved making it and my friends loved eating it and ultimately that's what it's all about.
RECIPES:
JAPANESE RISOTTO
1 C Arborio rice
3 T Sesame oil
3 C Fish stock
1 C Mirin
Double-handful Shiitake mushrooms, sliced
Double-handful Kabocha squash, cubed
1/3 C White Miso
1/3 C Mahon cheese, grated
Garnish:
Shiso Leaf, finely sliced
Black Sesame Seeds
Soy Sauce
1. Over medium-high heat, toast rice in sesame oil until rice is slightly transparent and starting to brown.
2. Add 2 C fish stock and squash, reduce heat to low, and simmer, stirring frequently.
3. When most liquid gone, add remaining stock, mirin and mushrooms. Continue simmering and stirring.
4. When all liquid gone, add cheese and stir to melt.
Garnish servings with shiso, soy sauce and sesame seeds.
CHOCOLATED-PEPPERCORNED PORK TENDERLOIN
1 Pork Tenderloin (they're mostly about the same size).
2 T Cocoa Nibs
1 T Sugar
1 T Wild Peppercorns
2 T Olive Oil
1/4 t Cumin, ground
1/2 t Paprika, ground
1 t Sage, ground
1. Grind the cocoa nibs and sugar to a paste in a mortar and pestle.
2. Add peppercorns and some oil and grind to paste.
3. Add herbs and a little more oil. Grind into paste.
4. Add a little more oil and grind fast until the paste becomes aerated and almost a mousse.
5. Trim pork and rub with paste.
6. Bake at 350 until just center is still pink.
7. Remove from oven, cover with foil, and rest for 10 mins.
GOLDEN BEET FLOWERS
Golden Beets
Sel Gris
Truffle Oil
1. Bring a pot of water to a boil.
2. Peel the beets and boil them whole until a knife slides in easily, but not all the way through.
3. Pour water from pot and then set under cold running tap to cool beets.
4. Remove beets from cold water when cool, dry, and shave with mandoline.
Mound on plate and garnish with salt and oil.
CARROT-ONION DUMPLINGS
Shu-Mei Skins
2 Carrots
1 Onion, small
1/3 C Goat Cheese, fresh and plain
Salt and Pepper
1. Grate carrots and onion.
2. Mix with cheese and season to taste (not too much salt.)
3. Place a teaspoon of filling into the middle of a wrapper, moisten the edge of the wrapper with a finger dipped in water, fold over and press wrapper edges together. Try not to leave much empty space inside the dumpling - they can pop when cooked.
4. Fry in your oil of choice. Cook a few at a time to keep oil at the same temperature.
MALTED SPONGE CANDY
(This is the recipe as it should be, not exactly as I tried it the first time.)
1 C Sugar
1 C Corn Syrup
1 T White Vinegar
1 T Baking Soda
1/3 C or more Malt Powder (You can get different kinds from any homebrew supply store - I used amber.)
1. Grease a glass baking dish. (Some recipes say use metal and butter but I had good luck with Corningware greased with canola oil.)
2. Heat sugar, vinegar and corn syrup slowly, stirring constantly. Use a pot of at least 2 quarts to allow for expansion.
3. Pre-mix baking soda and malt powder (I've yet to try adding the malt powder earlier or changing the amount of baking soda or vinegar.)
4. When the molten sugar reaches 300-310 degrees Farenheit (hard-crack candy stage) pour in the powder and mix like mad while the mixture inflates.
5. When well mixed and puffed, pour into the greased pan.
6. When cool, break with mallet. Eat plain or dipped in delicious things.
(Note, some recipes say that while the candy is cooling it can be scored so that it will break into even pieces. I'll have to try that.)
My grandmother used to get up at the crack of dawn and start cooking. Now, after making a batch of kreplach (a very small batch) I understand why.
This past Monday was Yom Kippur, Day of Atonement, on which we Jews are sealed into the Book of Life for the following year. It is a solemn day, with appropriately somber restrictions on a few things:
1. No bathing.
2. No wearing leather.
3. No perfume.
4. No sex.
and
5. No food or drink.
This last one is the most commonly associated with the holiday. But, as is traditional, the end of the fast and the end of the holiday (and the sealing of the Book of Life) are celebrated with a big meal. So, what did I decide to do on the afternoon I was fasting? I went to the grocery store and then spent several hours in the kitchen re-creating a favorite food of my trips to my grandmother's table - a staple of Jewish food and one of the most time-consuming foods to make.
If you don't know what kreplach are, take a look: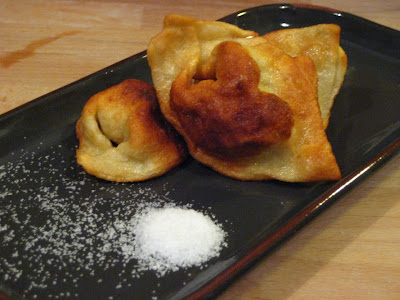 Now that you've seen them, how do you make them, you ask? Simple: make the filling, make the dough, put the filling in the dough, boil. But as usual, easier said than done.
First, the filling (the easy part, at least if you have a food processor). You'll need chicken, onion, salt, pepper, oil, and an egg. Parsley is optional. First, trim, cut up, and boil the chicken. Yes, boil. It's done when it is white all the way through. At the same time, dice and brown the onions. Cook them over medium heat with a little oil until they get nice and soft and brown. When these are ready, throw everything minus the egg into the food processor and process away. Proportions? My grandmother would say "When it's enough." I'll say that you should end up with a flavour that shows the sweetness of the onion, the savoriness of the chicken, a touch of salt to round out the palate, and pepper as a very light, almost citrusy accent. When it tastes right, add the egg and process some more, until it is a coarse paste somewhere between tuna salad and peanut butter. That's done. Make it first because the dough is the trickier part.
Dough: once again, my grandmother would say "When it's enough," in response to any question about measurement. She showed me once and I still couldn't record measurements. So I resorted to looking up a recipe that I will tweak until it feels right. The recipe was:
2 c Flour
2 Eggs
1/2 t Salt
1 T Water
Mix the salt and flour on a board or counter. Make a pile with a well in the middle, into which you add the eggs and water. Mix and knead by hand until the dough is smooth and elastic. Roll flat - the thinner the better. (The more elastic the dough, the thinner you can roll it and have it not break.) Cut into 2-3 inch squares. Once again, not so simple: the success of the kreplach depends on the dough. This time, while they tasted and looked good, the dough was too thick and chewy. I have to experiment to make it lighter and crispier, but yet not bubbly or crispy like a wonton. The dough is a challenge to mix because the egg goes everywhere and you really have to use your hands to corral what amounts to quick-dry cement at first. Once you get all of the liquid mixed into the flour, you have to knead a ball of sticky goo until it is not so sticky anymore and is a completely homogeneous mass.
 Keeping the dough from being too moist while kneading or from drying out while rolling (with the little extra flour you need to prevent it becoming a permanent addition to your countertop) is the biggest challenge, since that's what ultimately determines the texture of the cooked product.
  Presuming you have managed to get the dough rolled out and cut into squares, you then place a little bit of filling in the middle of each square and fold the square into a triangle, sealing in the filling. Then, take the two outermost points of the triangle, fold them around and pinch them together. See the pictures below for what they should look like when done (like really big tortellini.)
 Now boil them in water or soup - I used the water in which I cooked the chicken since it is sort of like soup but not enough like soup to keep or eat. Typically they rise to the surface when done, but it usually takes about 20 minutes. You can always resort to the most exact method of testing done-ness: nibble on a corner - if still doughy, cook them longer. They come out looking rather limp, bland, and pale, but we'll get to that.
 If you cook them in soup you can then just eat them in soup but I prefer them fried, when they trade their anemic paleness for strength and richness and crunch. Take them out of the broth and drop them into a hot frying pan with a bunch of oil - a quarter-inch or so. (I like putting them into the fridge first as it helps them solidify and not splatter as much when you fry them.) When they're brown and crispy they're done.
Mine came out a little chewy. If I find a better dough formula I'll add it here.
At last! Mazel tov and dayenu! Eat them! With a little salt.
Shhhhhhhhhhh...... I've got a secret. Well maybe not much of one, but fun and delicious nonetheless. You know how there has been a recent proliferation of "gourmet" and "specialty" grains like millet, flax, hominy, sorghum, tapioca, brown rice, red rice, red wheat, &c? All of these grains were staples of different peoples past. Quinoa is such a grain that has recently captured my attention, both because it is supremely good for the human body and also because it is universally and flexibly tasty. It is protein-rich, gluten-free, chock-full of nutrients, and has the taste and texture of a cross between oats, orzo, and arborio rice: nutty, but fresh and clean, and rich without being heavy. It tastes like something grown. Moreover, it is cheap, sold dried in bulk, and easy to prepare.
Here's the secret equation:
1 part quinoa
2 parts water
5-7 mins covered in a microwave
=
delicious.
Mix with anything. I'm trying a quinoa-based risotto next!
If you get raw, unmilled quinoa, you might have to go through a few extra steps of preparation to remove the outer shell of mildly toxic saponins, and the leaves contain oxalic acid, the same poisonous substance in rhubarb leaves, but it is these chemicals that make it naturally pest-resistant. So if that means we work a little, so what? I'll happily carry on knowing that we will be enjoying this food (and benefitting mightily from it) for some time to come. (See Wikipedia for more info.)
August is peach season in the Pacific Northwest, so what better way to enjoy the season than to indulge in a peach pie? However, as this pie will be created for a themed potluck dinner with friends - the theme being "Endangered Species" - I am going to try some substitutions. Bear with me, as I am wont to be "punny"...
Many peach pie recipes call for a bit of lemon juice. I plan to substitute tamarind paste, which is tart and citrusy like a lemon but also has a little bit of smoke and flowers in the palate, too. While tamarind is not endangered, the Golden Lion Tamarin monkey is very much so. So I suppose you could say I was monkeying with my peach pie by adding tamarin'd.
Another recent re-discovery of mine was the deliciousness of the Okinawan sweet potato. Firt, it is purple, which is awesome. Second, it is delicious, which is awesome - rather a cross of honey, oats, and hay, with a depth and softness to the flavour that is usually lacking in regular sweet potatoes or yams unless you slow-cook them with butter. Now, the Okinawan sweet potato is [thankfully] not endangered but a certain obscure Western Madagascar Yam is so. And I will take linguistic, biological, and culinary license by equating two roots which are even different colours and live on opposite sides of the world and include them in my now-orange-and-purple pie!
Or at least I will do so this evening. Pictures to come.
I love popovers. They're tricky, myriad tips and tricks exist that claim to make them foolproof, and I'm still trying to find a recipe and technique that works for me. I just found a website that takes a super-simple approach that I'm going to try tonight, albeit with the obligatory twist.* I'll post the results.
*The twist: Line the popover tin with bacon strips and broil until crispy and then add the batter. Once done, split open the popovers and fill with scrambled eggs and feta cheese. Hehehe :-)
UPDATE:
Popovers are awesome! I tried the twist and it came out OK. The biggest problem is that the bacon has to be super crispy before you put in the batter, and the only way to do that is to cook it beforehand, in the microwave, and then bend it into the popover tin before it hardens completely. Not easy. The other thing the bacon does is disrupt the rise of the popovers, making them not so tall and airy. In the future I think I'll stick to making the popovers as a plain, or just slightly adorned poof, to be filled with delicious additions (like bacon) after they have risen to their ful and glorious heights.
As cliche as it sounds summer really is the barbeque season and by barbeque season I really mean the season in which anything and everything can be cooked over an open fire. Hyperbole? I think not. Wait until you try grilling bacon or using a fire to heat up donuts and cookies. Once again, the breakfast cereal restriction may apply, but maybe fire-roasted granola could be delicious? But I digress. Burgers are particularly common BBQ food, but the burger that I made on Sunday night was anything but common. By itself the hamburger (misleadingly named as may be) is a kind of blank slate, not because meat has no flavour (untrue) but because the taste and texture of a burger are such easily malleable characteristics. Even plain ground beef - choose your favorite kind - will taste very different if cooked in a very flat patty as opposed to a thicker wheel. And will also taste different depending on how gently, how long and over what kind of heat the meat is cooked. But then comes the fun part - what to add to the meat before cooking? I tend toward some combination of the following:
Breadcrumbs - to hold moisture
Egg - makes the burger stick together
Salt and Pepper
Onion - makes the whole thing taste a little sweeter
Olive Oil - carries other flavour through the meat
BBQ Sauce - delicious in the burger! (Pick your favorite)
Worcestershire Sauce - sweet and smoky
HP Sauce - sweet and tangy (some tamarind in it)
Hoisin Sauce - also sweet and smoky
Vinegar or Lemon Juice
Garlic
Thyme
Oregano
Ginger
Cinnamon - with beef is a very good thing, adds depth
Chili Pepper Flakes - spicy is good!
The combination of things I mix into the meat changes every time, and also changes depending on what I want to pile on the burger after it is cooked. This time I just added breadcrumbs, oil, salt, pepper, and onion because I had big plans for this burger. See, I made a large batch of pesto the previous week and had a lot left over, so I wanted to see whether a burger stuffed with pesto would be a good thing. In short, yes, but that isn't the whole story...
A hot grill in the offing is not to be sneezed at, nor wasted, so we cooked not only burgers, but chicken (slathered in pesto or BBQ sauce,) thick slabs of onions, red peppers, and sweet potatoes wrapped in foil - the last by far the most fabulous. My first attempt at sweet potatoes in a fire was on a camping trip: we wrapped them in foil, skewered them on swords, and then stuck them in the fire. They came out rich and sweet and delectable. And then I had roasted yam on a sandwich and the idea to put them on a burger was born!  The pestoburger was enormous - a feat of enginnering triumph containing four tablespoons of pesto. I had to build a bowl of meat, put in the pesto, and then seal with more meat. Cooking and flipping very carefully avoided any catastrophic explosions and then I melted a slice of goat gouda on top for good measure. The final tower also included slices of roasted sweet potato, grilled onion, and roasted peppers, all on a toasted whole wheat bun. Not bad for a casual, unprepared-for, spur-of-the-moment Sunday evening cookout. And boy was it delicious! There was a lot of sweetness from the roasted vegetables and the pesto cut that nicely, still tasting fresh and clean despite cooking inside the burger. And I could even taste a little of the nuttiness of the pine nuts. And the best part was that none of the flavours was overpowering - I could still taste the meat (there'd be no point to the burger otherwise) and the other items all stayed present. Admittedly, though, it was a little hard to get all of the flavours in one bite.
A few final comments:
1. Trader Joe's BBQ sauce is quite tasty - we tried it on other burgers and on chicken and it has good sweetness but also a spicy bite.
2. Pesto also works really well on chicken skewers - it mellows out a lot.
3. When grilling, be sure to wear appropriate clothing - I got covered with soot and splatters of all the delicious things we cooked.
SUNDAY AFTERNOON BBQ
Feed as many as you like
ROASTED SWEET POTATOES:
Wrap sweet potatoes in foil and place on the grill (avoid the hottest parts but make sure that the potatoes get a fair amount of heat.) Turn every so often. You'll know they're done when they feel very squishy through the foil. Slice as condiment or eat like a burrito or eat with a spoon. These keep very well (and get even sweeter!) if re-wrapped in new foil and refrigerated - they're easier to slice for sandwiches when cold, too.
ROASTED ONIONS AND PEPPERS:
Cut 1/2 inch thick slices of onion and slightly wider strips of pepper and skewer. Put on grill, away from hottest parts, and turn frequently until both sides of onion are yellow-brown and glistening and edges of pepper are starting to char.
PESTO CHICKEN:
Clean, slice, and skewer chicken pieces. Rub with pesto. Grill, turning frequently to avoid the pesto burning - it's best if the pesto roasts but doesn't get the full heat of the fire. (BBQ sauce is good over hot flame, though.)
BURGERS:
Are delicious! And totally unique to the cook. So have fun!
We don't exactly live at the mercy of the seasons anymore when it comes to what we eat - that's the reality of the 24-hour Supermarket and the globalization and industrialization of food. It's actually quite amazing and impressive that, in theory, at any given moment anyone in the world could be eating something from anywhere else in the world with nary a can opener, glass jar, or other preservative in sight. I say "in theory" because it is actually a travesty that so much of the world's population does not have access even to the most basic subsistence nutrients, let alone the diversity of exotic foods that I may take for granted as part of my everyday life.
Perhaps it is for these reasons that I take so much pleasure from cooking seasonally and locally, and especially in making those recipes that mark different parts of the year. And though a sort of restriction, to focus primarily on what's available to me in the place I live, food that is living and growing in the same weather I feel every day, makes me feel that much more present in the current place and time and season. It probably makes sense, then, that the productivity of my kitchen would follow the productivity of the fields and orchards, which really takes off in late spring and early summer.
Three dishes mark my transition to warmer weather, each an illustration of that fleeting overlap between the delicacy of spring produce and the explosion of summer flavour. The first is Salsa, which I featured in an earlier post. This, more than any other dish I make, follows the transition from spring to summer to fall, changing in flavour and texture as time goes on and the first salsa of the year is definitely a milestone. In late spring, when the farmers' markets open, the available flavours are a combination of the earthiness of last years apples and onions from cold storage and the first slightly tart tomatoes and nectarines from inland where it gets hot sooner. The resulting salsa teeters on the edge between rich, deep, and hearty, like a steak, and bright and sharp, like a crisp spring day. Like the place at the red edge of the rainbow where you catch a glimpse of violet that hints at the next rainbow.
Another dish that really heralds the coming warmth and produce explosion of summer is the first rhubarb-basil compote or cobbler. Rhubarb starts a little earlier than basil and in truth both are really summer crops, but the cool thing about living and eating in Seattle is that within 50 miles there are such diverse microclimates that allow the cultivation of all sorts of foods (in some cases different neighborhoods seem to have different weather, but that's a different story.) But the first time that rhubarb and basil show up in adjacent wooden bins at the farmers' market I dive in and make a heap of compote for yogurt, ice cream, sandwiches, and really anywhere else I care to try. It is sweet and savoury and tart all at the same time, and so I keep finding other uses for it.
Another delightfully multipurpose sauce that continues to surprise me is pesto. The first pesto of the season is a momentous occasion in part because it is green. Winter is a lot of colours, from white to scarlet red, brown to rich purple, but one thing that is mostly absent from the menu is green. All that changes when spring rolls around. Many of the early greens - asparagus, kale, lettuces - prefer to stand on their own, lightly dressed so the subtlty and grace of flavour can be best appreciated. Basil, on the other hand, walks straight up to you and says "Hello, I'm delicious and I go with everything." A little egocentric, perhaps, but quite true. My pesto changes colour over the summer, too, depending on the state of the ingredients. The first batch is lighter - using green garlic and shallots instead of garlic cloves and the first basil of the season which is a brighter, sunnier green. The extra moinsture makes it slightly frothy, too. And the taste is fresh, almost like the smell of cut grass - a little sweet and a little sharp at the same time if you mix in the right amount of pepper and pine nuts, too. And it goes on everything. Well, maybe not breakfast cereal and such, but you never know... On Sunday I stuffed a burger with it and that was an incontrovertibly brilliant success!
So go forage. I haven't even begun to talk about some of the seasonal gems, like porcini mushrooms as big as a fist, a raspberry the size of a golf ball but infinitely tastier, and small, wrinkly, amazingly rich strawberries. But you only find if you taste, and you can only taste if you look, and you can only look if you go explore.
The one thing that makes everything better, or so they say. But the thing that has always bothered me about that expression is that it never makes any reference to what constitutes "butter." So, as I'm discovering more and more that it's really the simple things that matter, here is my completely biased treatise on butter:
I find it ironic that "common knowledge" about butter has come rather full circle - it was good, then it was evil (as compared to things like margarine)and now it's good again. Well, not really GOOD good, but better than any possible chemically-devised, -enhanced, or -otherwise-affected substitute because it comes from a cow and, when you really get down to it, all you need to make it is said bovine and a little bit of elbow-grease (or a Cuisinart...) Without further ado, here's how to make butter, courtesy of a friend of a friend in whose debt I will forever be for passing along this knowledge.
BUTTER
1 Pt Heavy Whipping Cream
Flavour - to be discussed below...
1. Assemble Cuisinart with standard chopping blade - the one shaped like two scimitars.
2. Pour in cream.
3. Press "ON"
4. Watch cream turn into butter.
You'll know it's done when it turns into one big solid lump. Intermediate stages are whipped cream, stiff whipped cream, slight curdling, bigger blobs, drier but smaller blobs, and fianlly the giant lump.
Seriously, that's it. And there's really nothing that tastes quite like it. It's so very fresh it's almost indecent and it has the texture of silk - light and smooth - and the taste of sunshine. I know I'll be accused of hyperbole, but try it and you just might have to agree.
Now to launch into the most controversial part of this little monograph: to salt or not to salt. The arguments run deep and bitter over which is better and in what context. Some swear by salted, some revile it, and vice versa. But here's the thing, the only thing that really matters is what you prefer. It's the same with any flavouring you might want to add - garlic, orange, thyme, strawberry, the possibilities are endless. The challenge is getting that balance of the fresh butter with the additions so it all floats on the tongue rhather than plummeting like an anchor into the stomach. I hear that honey is tricky, so if you get it right, please tell us how.
If you're wondering about butter in the exact science that is baking, my advice (as always, I suppose) is to experiment. For example, perhaps a chocolate chip cookie recipe calls for salted butter. If you use unsalted butter and, instead, put a few grains of coarse salt on top of each cookie when you put the dough in the oven, you may be pleasantly surprised at the result.
COMING SOON
1. 6-Month-Old Pizza
2. Mexican Wedding Cakes (or something close)
3. Kale and Spicy Olive Pesto and Pasta Befitting a King
4. How To Make Gnocchi
5. Ghost-Chile Chocolate
Dear Readers,
I'm not dead, I've just been fasting (in the metaphysical sense, at least) and am really hungry to express my love of food (&c. of course) again. It has been a long winter but the sun is coming back in fits and starts so bear with me while I get things up and rolling again and try to catch up on some of the highlights of the yawning chasm of the past six months.
A preemptive bon appétit.

 What is it? Bread pudding, though in this case made with stale cheddar cheese biscuits, baby potatoes, onion and carrots. And it is f***ing delicious! Bread pudding can be made either savory or sweet, and is really easy. All you really need is milk, eggs, and stale bread. The base is simple enough that you can do most anything with it, dependent on the type of bread. In this savory case, I added oregano, marjoram, paprika, sage, white pepper, and a little bit of tumeric (careful, it's strong stuff.) And a little cheese, which is almost never bad.


