skip to main |
skip to sidebar
Open your refrigerator. Go ahead, seriously. Now move aside the mayonnaise, the milk, the orange juice and anything else you bought in the last week and peer into the depths. Most of you probably do so with at least mild trepidation, if not outright terror. For some of you, Dirk Gently's lurking fridge might come to mind. Now I'm not suggesting you eat the potatoes that are not only eyeing you back but making threatening gestures as well. Nor am I saying you should cook with the green beans that are now blue with orange polka-dots and dancing the aforementioned polka. Rather, after you've thrown out all of the things that are funny colours, past their expirations, uncomfortably squishy, or trying to climb out of the bowl, you can probably find enough in the corners to make something like this: What is it? Bread pudding, though in this case made with stale cheddar cheese biscuits, baby potatoes, onion and carrots. And it is f***ing delicious! Bread pudding can be made either savory or sweet, and is really easy. All you really need is milk, eggs, and stale bread. The base is simple enough that you can do most anything with it, dependent on the type of bread. In this savory case, I added oregano, marjoram, paprika, sage, white pepper, and a little bit of tumeric (careful, it's strong stuff.) And a little cheese, which is almost never bad.
It comes out rich and warm - good winter food - and this one tasted a little like popovers, though with onion warmth and a little prickliness and tartness from the herbs. I ate some of it an hour ago, and I'm really looking forward to eating it for lunch tomorrow!
BREAD PUDDING
Basic Ingredients:
Stale bread (if not stale, toast a bit)
4 Eggs
2 C Milk
My Recipe adds:
1 Large Handful Onion, diced
1 Large Handful Carrots, chopped
1 Large Handful Potatoes (round fingerlings, unpeeled)
2 T Goat Cheese (fresh, herbed)
1 T Oregano (dry)
1 T Marjoram (dry)
1 T Paprika (smoked)
1 T White Pepper
1/2 t Tumeric
1/2 t Sage
1. Crumble bread in large chunks into an 8-inch square baking pan until about 2/3 full. (Preheat oven to 350°F, too.)
2. Add the vegetables and mix with the bread to distribute evenly.
3. Whisk eggs, milk, herbs and spices and pour over the bread mixture.
4. Let soak for a few minutes - make sure all the bread gets moist.
5. Bake at 350°F for 40 minutes (until knife comes out clean.)
6. Raise heat to 500°F for 5 minutes to brown and crisp up crust.
7. EAT!
So I had this idea: I like to cook, I like to feed people, I like making up recipes just to see what happens, and I like talking about these wacky recipes with the people I am feeding while we are all in the middle of eating said funky foodstuffs. In other words, I decided to invite a few people over to be guinea pigs to my mad culinary experiments. And I am truly flattered that they agreed to come and did so with with high expectations. But enough about the idea, on to the food. How's this for a meal? (Delicious photos by Smita.)
I started with a risotto - but one based entirely on basic Japanese ingredients. Instead of using olive oil to saute and brown the rice, I used sesame oil. Instead of vegetable or meat stock I used a broth from smoked bonito, sardine, and kelp with some white miso paste for texture and flavour depth and a little bit of ginger. Instead of wine I used mirin. The vegetables were kabocha squash and shiitake mushrooms. And to garnish, black sesame seeds, super-finely sliced shiso, and soy sauce. I still used arborio rice for texture, and I also used a very little cheese to hold it together - a very light-flavoured hard Mahon.
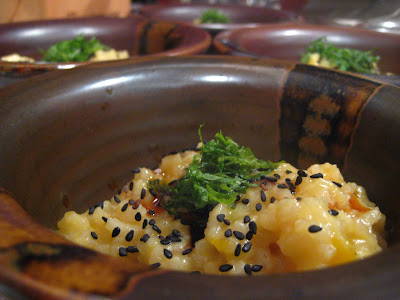 The entire recipe was my attempt at a sort of macro-scale fusion recipe. I wanted to see if the texture of risotto could be successfully combined with entirely Japanese flavour. I'm excited that the result is a resounding "yes!" The mouth-feel of this experiment was exactly the same as my more traditional risotto recipes, but the taste was of a sweet miso-mushroom soup with the umami of soy, toasty overtones of sesame, and sweet earthy bites of squash. The greatest, yet most subtle, change was definitely the liquids. It was hard to really identify how the fish stock and miso differed from chicken or vegetable stock, but the effect on the final dish is great. I think the european-style stocks have much more onion, carrot, garlic, and savory herbs than their Japanese counterparts. Mirin is also worlds apart from white wine - much sweeter and with slightly beery flavour. I think that's why the dish came out sweet - next time I'll use less.
Making this dish gave me a great excuse to go to Uwajimaya, the glorious Japanese supermarket. Since I don't read Japanese, figuring out which is the right dried soup base to use and how to use it, or which miso paste is which, is always fun - involving deciphering packaging diagrams and finding numbers in the directions from which to interpret measurements, timing, and whether something might kill you if eaten wrong.
The second course was a pork tenderloin, rubbed with a paste made from cocoa nibs from Theo Chocolate, wild peppercorns, sugar, olive oil, sage, paprika, and cumin. I ground the spices and chocolate with a mortar and pestle, adding a little olive oil at a time until the paste became the consistency of a dense chocolate mousse. Plain, the mixture tasted tart and nutty, with a little heat from the paprika and pepper and some dusty warmth from the sage. Rubbing it on the pork smelled like paprika and chocolate. Baking it smelled like cumin plus some sweet smoke. And eating it was a very mild nutty aftertaste to the pork, which I slightly overcooked. It looked really good, but wasn't as richly flavoured as I'd hoped. Perhaps marinating in the rub overnight would have allowed the flavours to penetrate and develop. So the verdict: tasty, but a little mundane.
 The accompaniment to the pork was shaved par-boiled golden beets with sea salt, pepper, and truffle oil. Boiling the beets made them not quite so crunchy, but I kept some firmness by not boiling too long and then immediately chilling the beets in cold water. Shaved vegetables are fun to arrange because they are so malleable and delicate. These came out looking like fluffy yellow roses on the plate. And they tasted sweet and grassy at the same time - the salt magnifying the sweetness, the pepper adding a little tart twinge, and the truffle oil smoothing out the texture and rounding out the taste. I also used some leftover shiso to garnish this plate, and the shiso went surprisingly well with the beets - a cool and herbal complement to the sweetness of the beet.
The next course was dumplings (ravioli, really) of goat cheese, carrot, and onion. I grated the carrot and onion with the brilliant multi-purpose "Kitchen Mama" tool I got at Daiso. This grater produces basically a rough paste of anything put to it (including knuckles, I'm sorry to say.) When you pulverize vegetables to such an extent, lots of the liquid comes out. As I didn't want the filling to be watery anyway, I used a looseleaf tea bag to squeze off all excess moisture. Cheesecloth would work, too, but more stuff sticks to it and the tea bag was already a convenient pouch-shape. Note, as well, that when you grate onion it's that much more potent - whew! I mixed the drained carrot and onion with plain fresh goat cheese and a little salt and pepper.
 As wonderful as it is to hand-make dumpling skins, this is where I decided to cut a corner. I found, after much searching, locally-made, freshly-packed shu-mei skins that did not contain all of the preservatives and stabilizers common to nationally-distributed ones. They're basically just a delicate circular noodle. You put a bit of filling in the middle, run a wet finger around the edge, fold in half, and press opposite edges together to make a little fat half-moon. Honestly, you could put anything in them (and I intend to try!) I fried the finished dumplings in canola oil though you can steam them, too. Shu-mei skins are very delicate so these were finished quickly - puffy, crisp and golden once I finally got the oil temperature right. Next time I'll use a thermometer so I can tell you what "right" really was, though I'm sure you can find lots of frying info online. There wasn't actually much taste of carrot, despite the amount I used. The cheese was dominant, with a little onion and a little sweetness reminiscent of fresh carrot juice.
Sponge candy was completely unknown to me until I started looking for a way to reproduce the core of the Whopper. No, not the hamburger - that I can do. I mean that mysteriously crisp and malty candy covered in chocolate. There are al sorts of approximations out there, but the one that seems to hold the most promise is sponge candy. As I mentioned, I'd never heard of it, but when I told my mother she exclaimed, "Oh yeah, like honeycomb. I love honeycomb! Oh, can we please make some when you come home for Thanksgiving?!" So it appears I missed something. That, or it was popular in the 1950s. Likely the latter, since candymaking is something of a vanishing art.
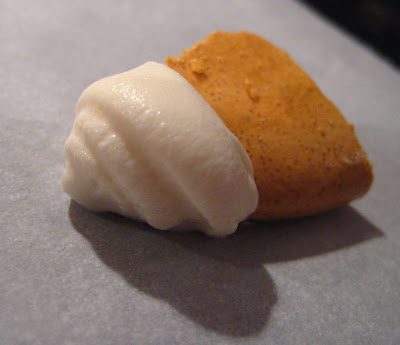
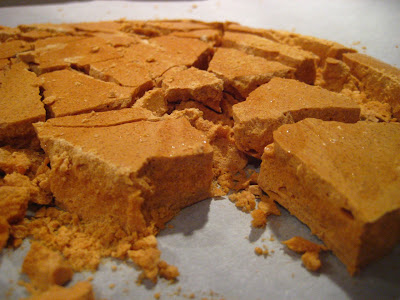 It is very simple: sugar, vinegar, and baking soda. Remind anyone of science-project volcanoes? When you mix the baking soda into the vinegar-primed melted sugar, and stir like crazy, you get lots of little expanding bubbles trapped in the sugar. When you pour out the sugar into an oiled baking dish and let it cool, it hardens into a delicate, crunchy sugar matrix (that you break apart by hitting it with a hammer!) To get it malty, I added malt powder mixed with the baking soda. Malt powder is basically another type of dried, crystallized sugar (maltose, among a few others.) But it has that very distinctive flavour (of Whoppers!) Suffice to say, I, too, ow love sponge candy, especially malted. I'm going to try another batch with more malt and also using the recommended half-sugar-half-corn syrup mixture (which should enable me to get the molten sugar to hard-crack temperature with less browning and also enable a lighter, fluffier candy when hardened.) But still: yum!, especially when dipped in leftover cream cheese frosting from birthday-cake adventures.
 Last of the evening was a nightcap. A fabulous bar called Knee High Stocking Company makes a drink called the "St. James Cooler" that is a mixture of Jameson whiskey, St. Germain elderflower liqueur, lemonade, mint, and soda. I've had it. It is delicious and refreshing. And it inspired me to try a similar concoction, though a calmer version. I mixed 1 measure Powers' Whiskey, 1/2 measure Extra Dry White Vermouth, 2 Tablespoons elderflower concentrate ("Fladersaft" from Ikea, of all places), and a dash (1/8 tsp) lavender vodka that I made last year. More on the vodka some other time. Shake up that mixture with ice and serve neat. Refreshing and relaxing at the same time. I think it could be good both before and after dinner.
So that was the feast. I loved making it and my friends loved eating it and ultimately that's what it's all about.
RECIPES:
JAPANESE RISOTTO
1 C Arborio rice
3 T Sesame oil
3 C Fish stock
1 C Mirin
Double-handful Shiitake mushrooms, sliced
Double-handful Kabocha squash, cubed
1/3 C White Miso
1/3 C Mahon cheese, grated
Garnish:
Shiso Leaf, finely sliced
Black Sesame Seeds
Soy Sauce
1. Over medium-high heat, toast rice in sesame oil until rice is slightly transparent and starting to brown.
2. Add 2 C fish stock and squash, reduce heat to low, and simmer, stirring frequently.
3. When most liquid gone, add remaining stock, mirin and mushrooms. Continue simmering and stirring.
4. When all liquid gone, add cheese and stir to melt.
Garnish servings with shiso, soy sauce and sesame seeds.
CHOCOLATED-PEPPERCORNED PORK TENDERLOIN
1 Pork Tenderloin (they're mostly about the same size).
2 T Cocoa Nibs
1 T Sugar
1 T Wild Peppercorns
2 T Olive Oil
1/4 t Cumin, ground
1/2 t Paprika, ground
1 t Sage, ground
1. Grind the cocoa nibs and sugar to a paste in a mortar and pestle.
2. Add peppercorns and some oil and grind to paste.
3. Add herbs and a little more oil. Grind into paste.
4. Add a little more oil and grind fast until the paste becomes aerated and almost a mousse.
5. Trim pork and rub with paste.
6. Bake at 350 until just center is still pink.
7. Remove from oven, cover with foil, and rest for 10 mins.
GOLDEN BEET FLOWERS
Golden Beets
Sel Gris
Truffle Oil
1. Bring a pot of water to a boil.
2. Peel the beets and boil them whole until a knife slides in easily, but not all the way through.
3. Pour water from pot and then set under cold running tap to cool beets.
4. Remove beets from cold water when cool, dry, and shave with mandoline.
Mound on plate and garnish with salt and oil.
CARROT-ONION DUMPLINGS
Shu-Mei Skins
2 Carrots
1 Onion, small
1/3 C Goat Cheese, fresh and plain
Salt and Pepper
1. Grate carrots and onion.
2. Mix with cheese and season to taste (not too much salt.)
3. Place a teaspoon of filling into the middle of a wrapper, moisten the edge of the wrapper with a finger dipped in water, fold over and press wrapper edges together. Try not to leave much empty space inside the dumpling - they can pop when cooked.
4. Fry in your oil of choice. Cook a few at a time to keep oil at the same temperature.
MALTED SPONGE CANDY
(This is the recipe as it should be, not exactly as I tried it the first time.)
1 C Sugar
1 C Corn Syrup
1 T White Vinegar
1 T Baking Soda
1/3 C or more Malt Powder (You can get different kinds from any homebrew supply store - I used amber.)
1. Grease a glass baking dish. (Some recipes say use metal and butter but I had good luck with Corningware greased with canola oil.)
2. Heat sugar, vinegar and corn syrup slowly, stirring constantly. Use a pot of at least 2 quarts to allow for expansion.
3. Pre-mix baking soda and malt powder (I've yet to try adding the malt powder earlier or changing the amount of baking soda or vinegar.)
4. When the molten sugar reaches 300-310 degrees Farenheit (hard-crack candy stage) pour in the powder and mix like mad while the mixture inflates.
5. When well mixed and puffed, pour into the greased pan.
6. When cool, break with mallet. Eat plain or dipped in delicious things.
(Note, some recipes say that while the candy is cooling it can be scored so that it will break into even pieces. I'll have to try that.)
I love popovers. They're tricky, myriad tips and tricks exist that claim to make them foolproof, and I'm still trying to find a recipe and technique that works for me. I just found a website that takes a super-simple approach that I'm going to try tonight, albeit with the obligatory twist.* I'll post the results.
*The twist: Line the popover tin with bacon strips and broil until crispy and then add the batter. Once done, split open the popovers and fill with scrambled eggs and feta cheese. Hehehe :-)
UPDATE:
Popovers are awesome! I tried the twist and it came out OK. The biggest problem is that the bacon has to be super crispy before you put in the batter, and the only way to do that is to cook it beforehand, in the microwave, and then bend it into the popover tin before it hardens completely. Not easy. The other thing the bacon does is disrupt the rise of the popovers, making them not so tall and airy. In the future I think I'll stick to making the popovers as a plain, or just slightly adorned poof, to be filled with delicious additions (like bacon) after they have risen to their ful and glorious heights.
Such read the text message I received one Sunday morning from a friend attending the Broadway Farmers' Market here in Seattle. There is a friendly, laid-back guy at the market who sells baked goods - delicious ones - representing Heavenly Pastry & Cake. And he's resurrected his german grandmother's soft pretzel recipe (or something like that), in my opinion for true benefit to the general public. The pretzels live in a brown paper bag that advertises their buttery goodness by looking buttery itself. The pretzels themselves are smaller than expected, golden-brown and irregular. Covered in flaky kosher-style salt, they're chewy and dense and a little bit sweet, too. And oh so buttery! A squeeze of yellow mustard and you're off to pretzel heaven.
I'll post a picture next time I go get a pretzel. While eating the two I bought last weekend I forgot about basically everything else.
UPDATE:
I went to the market today and arrived just after all of the pretzels were eaten. Damn. But instead I made do with something called a Big Cheezy, a cross between a biscuit and a scone made with cheese and jalapeños - rich and tangy and a little salty, but good for breakfast because there's still a bit of sweetness in the dough in addition to all the savory goodness.
There's no accounting for taste, and sometimes differences in individual sense of taste can get you condemned to the culinary doghouse for longer than you might expect. May the two following examples serve as warning to the gastronaut seeking to share an adventure in food with unprepared or skeptical companions.
I love cheese, in a Wallace and Gromit kind of way. Almost every kind of cheese is delicious (I hesitantly except Morbier from my general love of cheese but that's a story for another time.) But many people are unprepared for the variety of cheeses available, or for their occasionally pungent nature. I was to see some friends one evening many months ago and I thought to bring some bread and cheese along with me. I chose a baguette and a few favorites - Boucheron (an aged log of goat's cheese,) and I think a wedge of Rogue Creamery's Smokey Blue Cheese, and, most particularly, a small crock of St. Marcellin, a cow's-milk cheese that becomes soft and runny as it ages so it is sold in small pottery dishes. It can be particularly pungent, but the taste is actually quite mild and milky despite what the nose may say (and I think it smells rather good, but apparently I can't be trusted!) 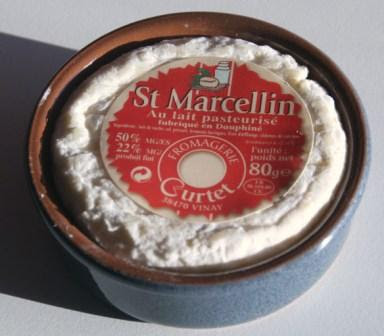 In ignorance, I laid out the cheeses with a brief description of each and the assembled company fell to, trying the more familiar first and then moving on to the St. Marcellin. One of my friends took up a small piece of bread with a small dab of the cheese, tasted it, immediately pulled a pained and disgusted face and whether she spit out the morsel or not I cannot recall. Exclamations of horror and dismay followed, along with solemn vows never to trust my taste in cheese ever again. My credibility was shattered. I've spent the time since slowly rebuilding my cheese reputation and paying much more careful attention to the tastes of everyone else when I plan to introduce a potentially dangerous cheese.
But even with ample forwarning will an experiment not to everyone's taste cause long-standing condemnation of or skepticism toward of one's cooking skills or sense of taste (not to mention state of sanity.) I refer, for illustration, to the Garlic Chocolate-Chip Cookie episode (of which there actually have now been two, since I was foolhardy enough to attempt to win over some skeptics by a second try.)
I love garlic, to an extent which may be considered a fault by some. It does not necessarily belong in everything, but I am always interested to find where else it might be delicious. My mother was given a recipe for garlic chocolate chip cookies from the Garlic Lovers' Cookbook and shared it with me. I decided to make them. The first time I made them, I followed the recipe. The second time I experimented. Changing the recipe didn't have much of an effect on the taste, rather on the texture. But I'll describe the variations later.
The first time, I also made the absurd leap of faith that unproven garlic chocolate-chip cookies would be improved by lavender icing. The combination proved absolute sensory overload to many of my friends, whether they would have liked either part independently. It didn't help that I made the first batch of lavender icing way too strong - three or four times too strong. As such, while some liked all of the above, even in combination (once I'd weakened the icing), for others the reaction was dramatic - one friend memorably describing the experience as like to "being hit in the mouth with a bar of soap wrapped in a dirty sock." Lovely. But despite the negative press, I cajoled many to try both the first and the eventual second versions. Some really like the concept and the result, others can't understand why one would ever try such an abomination and certainly can't abide the fruit of it. And still others come with an open mind and then can't figure out whether they like the cookies or not. Generally, though, for all but the people who like them, my standing as a cook of taste and sanity is called into question, accompanied by constant asking about future public offerings, "is there garlic in that?"
With that colossal grain of salt, garlic chocolate-chip cookies are very much like regular chocolate-chip cookies, just with a bit more depth and complexity. The chocolate-chip cookie is a good foundation for experimentation because it is already delicious. The garlic just adds a savory warmth to the flavour, with more or less sweetness or garlic aftertaste depending on how exactly you cook the garlic before mixing it into the cookies. Version one followed the simmer-garlic-in-maple-syrup original recipe, while version two was the slightly more aggressive boil-sugar-and-caramelize-garlic-in-that experiment that was a little scary and ultimately much more garlicky. The texture of the first version was much more like regular cookies, crispy and a little chewy, getting a bit stiffer over the few days I had them. Version two was much harder and a bit stickier at first and then softened up over the next few days in the cookie jar - weird. The method was scary because I poured boiling sugar and garlic into the cookie dough, which promptly became almost liquid - baking really is edible chemistry and I think I messed with the standard experimental procedure a wee bit, hence the odd final texture. And the caramelized sugar defintely added a slightly smoky caramel taste, too. Best start with the original recipe, transcribed from Accidental Hedonist where the description of the flavour is much the same as my own experience, so I'm not entirely crazy...
GARLIC CHOCOLATE-CHIP COOKIES
Makes 5 dozen or so.
10 cloves Garlic
½ C Maple Syrup
1 C Unsalted Butter, softened
¾ C Brown Sugar
¾ C White Sugar
2 Eggs
1 t Vanilla
½ t Salt
2½ C Semi-Sweet Chocolate Chips
½ C Walnuts, chopped (optional)
2½ C All Purpose Flour, sifted
1 t Baking Soda
3 bowls
Boiling Water
1. Drop whole, unpeeled garlic cloves into boiling water and cook until tender (about 7 minutes). Remove garlic from the water, peel and chop. In Bowl #1: soak garlic in the maple syrup for 20 minutes to one hour - the longer you soak the garlic, the stronger the garlic taste.
2. Preheat oven to 375°F.
3. In Bowl #2: cream together butter, sugars, eggs and vanilla until light and fluffy. In Bowl #3: sift together flour, salt and baking soda. Mix flour mixture into butter mixture. Add chocolate chips and walnuts, mixing until evenly distributed.
4. Add maple syrup (+/- garlic) to dough. (If you want more garlic flavour, leave the garlic pieces in, otherwise strain them out and just use the syrup.
5. Drop by tablespoonfuls onto ungreased cookie sheets, about 2 inches apart from each other. Bake for 8 to 10 minutes (or however you prefer your cookies.) Remove from oven and cool on racks.
LAVENDER ICING
Be very sparing with the lavender essence - it is stronger than it seems. This is also very much a try-as-you-go recipe that you have to make to your taste and texture preferences.
Sweetened Condensed Milk
Powedered Sugar
Lavender Essence (you should be able to find culinary lavender essence somewhere - it happens to be readily available in Washington.)
Start with a few tablespoons of the condensed milk. Mix in the powdered sugar by the teaspoon until the icing is thick enough. Mix in 2 drops at a time of the lavender essence. Taste after each addition and err on the side of too little - just a hint is sufficient. Use at will.
Sometimes after work I arrive home to an unfriendly and mostly empty refrigerator that does not readily offer up any particularly obvious tasty morsels for dinner. On such days the fridge does not so much lurk in a corner - like the one conjured by Douglas Adams to terrorize the kitchen of his 'Holistic Detective', Dirk Gently - but it does exert a somewhat chilling influence on the atmosphere of the kitchen and on my spirits at the end of a tiring day. And a barren fridge certainly does not dull an emptiness of stomach, either.
Before getting too carried away with the bleak imagery, let me clarify. On the particular evening in question, my refrigerator contained the following: one bunch of rather old asparagus, four ageing rutabaga, three partially-finished bottles of wine of varying ages, some jam, half a carton of Trader Joe's vegetable broth, some gouda cheese, and a bottle or two of beer. (Let's ignore for the present that some consider beer a suitable substitute for dinner, especially in the case of Guinness, shall we?) So technically my fridge was not empty, but neither did any of the above seem to make much of a warm or comforting, let alone tasty, meal.
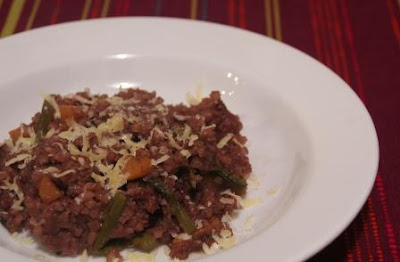 One of the media that seems to lend itself well to combining odd combinations of ingredients is risotto, with the added benefit of its making a generally savory and satisfying meal. I had some arborio rice in the cupboard so I set about to make Odds and Ends Risotto, which I imagine I will make again, at some point, with completely different results dependent on my refrigerator's capricious whim. Risotto is also wonderful in its essential simplicity - one cup of rice, a splash of olive oil, and four cups of liquid are all that are necessary for the base, taking about half an hour and almost no work. Where the adventure begins is when choosing what to use for liquid and also what else you want to throw in the pan.
A typical liquid mixture is three cups chicken stock and one cup white wine. Recipes abound for what vegetables are best and how best to pre-cook them, when to mix them in, what cheeses are best, &c. so I suggest you poke around a bit to see what other people have tried, too. Or you can try something like this:
For liquid, I used the remainder of the vegetable broth, the remainder of my white wine, and the remainder of my red wine, since that added up to just about four cups. For the vegetables, I rescued and chopped the few salvageable asparagus spears (about one and a half cups chopped) and also cut up two of the rutabaga into half-inch cubes (about 2 cups chopped.) Oh, and some of the gouda to make it all stick together a bit more at the end. An odd mixture, to be sure, but I hoped that the asparagus would give the dish an earthy yet fresh and green taste, the rutabaga a subtle sweetness and a little crispness, the red wine a bit of warmth, and the aged gouda a slightly tart and lemony tang.
The easy way to make risotto involves little more than heating rice and olive oil in a heavy saucepan until the rice becomes a little translucent and golden, and then throwing in the liquid and simmering until all the liquid is gone, stirring occasionally. The more labour-intensive method is to slowly add the liquid a bit at a time and simmer and stir constantly until the bit you added has been absorbed before adding more. This latter method certainly allows for more precision in determining the final texture of the dish, but does not allow for either cooking vegetables in with the rice (as I did with the rutabaga and asparagus) or for doing anything else while you wait hand and foot on the risotto pan. So I cooked everything together, tossing in the rutabaga shortly after pouring in the liquid at the beginning (they do well with a nice long simmer), and waiting until I thought it had about five minutes to go before adding the asparagus so it wouldn't overcook.
The result was tasty, and also a funny purple color which I don't normally associate with risotto - especially dotted with orange and green as it was by the vegetables. And it tasted much as expected, which only added to the satisfaction of the meal. Thankfully the vegetables remained crisp, not overcooked, which was a good contrast of texture, too. Next time, who knows what hidden gems the lurking fridge may contain.
ODDS AND ENDS RISOTTO
This is an intentionally general recipe, for use as a springboard into the waters of delicious unknown risottos.
1 C Arborio Rice
3 T Olive Oil (if you need more to coat the rice completely, add more)
4 C Liquid (Generally around 3 C Stock of some kind and 1 C wine)
½ C Grated Hard Cheese, though I imagine blue or goat cheese could also be mighty tasty. (Optional, but highly recommended.)
3 C (approximate) Other Stuff (This could be vegetables such as I used or pre-cooked sausage or other meats, or a combination.)
Herbs, Spices, Salt, Pepper to taste.
1-2 T Butter (if you want it to be really rich!)
Combine olive oil and rice in heavy saucepan over medium heat, stirring to make sure all rice is coated in oil, until rice is translucent and starting to turn a golden-brown (2-5 minutes.) Add liquid and bring to boil. As soon as it boils, turn down to a simmer (still bubbling, but small, gentle ones.) Simmer uncovered, stirring occasionally to make sure the botom doesn't stick, until all liquid is absorbed (about 20 minutes.) Add cheese (and butter if you're using it) and stir until melted in.
If using vegetables:
Root Vegetables: Chop into half-inch to one-inch cubes and toss in as soon as the liquid boils.
Squash/Zucchini/Mushrooms: Cut into slightly larger pieces and toss in about half-way (after simmering the rice for 8 minutes or so.)
More Delicate Vegetables: Chop as you like and add closer to the end. Add the vegetables later than you think you should because they will continue to cook after you take the pan off the heat.
If using meat:
Cook the meat beforehand, at least partially, to make sure it is fully cooked when the risotto is done. Sausage, bacon, pork or poultry are good, shellfish, too, though I've never tried it myself. Not sure what I think about beef or fish - if you try it, leave a comment with directions. Mix the meat in near the end if you want it to retain its own flavour and a different texture (like crispy bacon or sausage), or earlier if it has a strong flavour you want to impart to the overall dish.
Serves 4-6.
What I made for dinner tonight seems like a really good place to start this conversation because, well, I just finished making it and am currently eating it. My dinner this evening actually began life a number of weeks ago, around the time I was finishing Barbara Kingsolver's new book, Animal, Vegetable, Miracle - a delicious read in many ways, not least because of the recipes. At the time, one of the most iminently seasonally-doable recipes was the weighty-sounding Asparagus and Morel Bread Pudding, which was instantly appealing because the name contained the words 'Asparagus,' 'Morel,' 'Bread,' and 'Pudding.'Off I went to the West Seattle Farmers' Market, with intent to procure the necessary ingredients (I had convinced some friends to come feast on the results later that day.) Given the season and given the weather I thought I was golden. Alas, I was informed I was two weeks too early for asparagus - too cold a spring, courtesy of increasingly fickle Pacific Northwest weather. The farmer even went so far as to call his wife at the Ballard market to ask if she had seen any over there, but no luck. And yet, I was undeterred. Early-spring greens were abundant, even such things as flowering kale - looking fresh and springy with its small yellow flowers and tasting, the farmer said, like a cross between broccoli and asparagus, only a bit sweeter, at which point he tore off part of a stem and handed it to me to eat. He was right - good evidence, I suppose, that farmers are the true 'foodies,' knowing the taste, use, care and value of everything grown, from germination or infancy to harvest.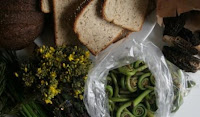 I decided to experiement (which, so you will find, is something of an inevitability when I cook) and to substitute half flowering kale and half fiddlehead ferns for the asparagus in the recipe, chopped to about the same dimensions as recommended. Fiddleheads are a teaser for asparagus season, resembling a very mild asparagus in taste even if they do look rather alien - like coiled tentacles... Morels were, thankfully, easy to come by, if astonishingly expensive. These were fresh, tender, and some as big as my fist, and they smelled like a rain-doused forest fire. An almost-purple pumpernickel loaf completed the shopping and off I went to assemble. I think I used too much bread. Of course, this also meant that I had to approximately triple the cheese (though I might have done so anyway - more on cheese some other time.) But it also meant that I had a lot of volume and my baking dishes weren't big enough. My pudding came out about 2 ½ inches high and took an extra 30 minutes to cook, so I think a shallower pudding would cook through more quickly and also have more delightful crispy bits.
  Regardless, despite my substitutions and experimentation, the verdict? Delicious. Soft, springy, earthy - serious comfort food. Also, I ended up with enough for an army, so it is a good thing that it both freezes and reheats well and is a versatile platform for elaboration. Which brings me to my dinner tonight. I arrived home famished, for whatever reason, and racking my brain for what to make that was a| quick, b| delicious, and c| warm, as it was about 50F, dark, and raining in Seattle, despite it being 21 May. My freezer yielded the answer - I still have about 6 servings (good-sized 3" x 5" x 1" blocks) of the bread pudding put away against just such a rainy day, even after feeding 3 people, sending them home with an extra serving or two each, and eating the leftovers for lunch for a week! But inevitably, when reheating something that is, by nature, a little soft and soggy, that soft and soggy something becomes even more so. Feeling slightly decadent, I defrosted the bread pudding in the microwave and then fried it in butter - only about half a tablespoon, though. Frying the slices of bread pudding dried them out a bit and made the outside crispy again, though perhaps that's an obvous benefit to frying anything. The intoxicating smell of browning butter and bread made me crave some caramelized onions, too, so I chopped up a small yellow one and tossed it in the pan with the bread pudding, and then left the onions in the pan with a pinch of salt to brown and soak up the rest of the butter and jusces after taking the bread pudding out. Cooking, especially in anticipation of what I know will be a really tasty meal, always makes me happier and also a bit silly and creative, so by the time I was finishing up the onions I had a real zinger of an idea. On the suggestion of a friend, one of the things I had tried when the bread pudding was fresh was eating it with maple syrup. Definitely a good idea, but also definitely very sweet. Today, that sweetness sounded appealing again, but I wanted to spice it up a bit. After taking the onions out of the pan, and with the pan still hot but off the heat, I poured in a few tablespoons of maple syrup. The syrup bubbled and boiled a bit, getting a little darker, at which point I added about a tablespoon of Cholula hot sauce. This addition caused more frothing as I heated the pan a little and mixed it all together, and once it was mixed to a slightly cloudy dark brown I poured it over the onions and crispy bread pudding. I shaved a bit of aged gouda (bought at the Seattle Cheese Festival) over it all and I just finished eating it - warm and rich, soft, but with crispy bits, earthy yet tangy, and sweet, but with a spicy edge to keep on warming after the plate is cleaned. It may not be pretty, but not bad for one pan and a bunch of leftovers.
 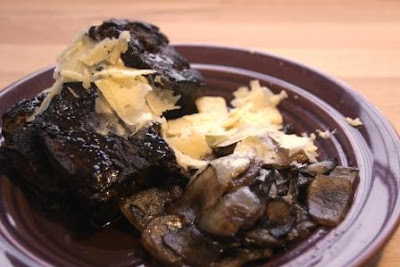 ASPARAGUS AND MOREL BREAD PUDDING(see the recipe at http://www.animalvegetablemiracle.com/BREAD%20PUDDING.pdf)My notes: 1. Use more cheese. How much more depends on you. 2. Make in a baking dish that allows for a thickness somewhere around 1 ½ inches.3. I love rosemary, especially the smell, so I dropped a few sprigs on top of the just-finished pudding to add to the already intoxicating aroma.SPICY MAPLE GLAZEThis recipe is done entirely to taste - use your favorite hot sauce and add more of it if you like it spicier. This mixture is a good starting point.6 T real maple syrup1 T Cholula hot sauceTo a heavy, nonstick (which I prefer not to use except for extremely sticky things) pan that is already at medium temperature, add the maple syryp. It should immediately start to bubble - if not, raise the heat a little but be careful not to boil the syrup too much. (I started with the hot pan off the heat so I could better judge how vigorously the syrup would boil without extra heat - you can always place the pan back on a hot burner for a moment to get things rolling.) Once the syrup darkens in color and begins to really froth, make sure to stir well and add the hot sauce - the boiling will subside. Once well-mixed, bring to a frothy boil again and then immediately pour over the favored food, be it waffles, pork chops, or ice cream.

 What is it? Bread pudding, though in this case made with stale cheddar cheese biscuits, baby potatoes, onion and carrots. And it is f***ing delicious! Bread pudding can be made either savory or sweet, and is really easy. All you really need is milk, eggs, and stale bread. The base is simple enough that you can do most anything with it, dependent on the type of bread. In this savory case, I added oregano, marjoram, paprika, sage, white pepper, and a little bit of tumeric (careful, it's strong stuff.) And a little cheese, which is almost never bad.


