skip to main |
skip to sidebar
My grandmother used to get up at the crack of dawn and start cooking. Now, after making a batch of kreplach (a very small batch) I understand why.
This past Monday was Yom Kippur, Day of Atonement, on which we Jews are sealed into the Book of Life for the following year. It is a solemn day, with appropriately somber restrictions on a few things:
1. No bathing.
2. No wearing leather.
3. No perfume.
4. No sex.
and
5. No food or drink.
This last one is the most commonly associated with the holiday. But, as is traditional, the end of the fast and the end of the holiday (and the sealing of the Book of Life) are celebrated with a big meal. So, what did I decide to do on the afternoon I was fasting? I went to the grocery store and then spent several hours in the kitchen re-creating a favorite food of my trips to my grandmother's table - a staple of Jewish food and one of the most time-consuming foods to make.
If you don't know what kreplach are, take a look: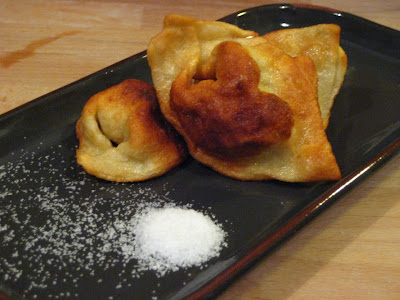 Now that you've seen them, how do you make them, you ask? Simple: make the filling, make the dough, put the filling in the dough, boil. But as usual, easier said than done.
First, the filling (the easy part, at least if you have a food processor). You'll need chicken, onion, salt, pepper, oil, and an egg. Parsley is optional. First, trim, cut up, and boil the chicken. Yes, boil. It's done when it is white all the way through. At the same time, dice and brown the onions. Cook them over medium heat with a little oil until they get nice and soft and brown. When these are ready, throw everything minus the egg into the food processor and process away. Proportions? My grandmother would say "When it's enough." I'll say that you should end up with a flavour that shows the sweetness of the onion, the savoriness of the chicken, a touch of salt to round out the palate, and pepper as a very light, almost citrusy accent. When it tastes right, add the egg and process some more, until it is a coarse paste somewhere between tuna salad and peanut butter. That's done. Make it first because the dough is the trickier part.
Dough: once again, my grandmother would say "When it's enough," in response to any question about measurement. She showed me once and I still couldn't record measurements. So I resorted to looking up a recipe that I will tweak until it feels right. The recipe was:
2 c Flour
2 Eggs
1/2 t Salt
1 T Water
Mix the salt and flour on a board or counter. Make a pile with a well in the middle, into which you add the eggs and water. Mix and knead by hand until the dough is smooth and elastic. Roll flat - the thinner the better. (The more elastic the dough, the thinner you can roll it and have it not break.) Cut into 2-3 inch squares. Once again, not so simple: the success of the kreplach depends on the dough. This time, while they tasted and looked good, the dough was too thick and chewy. I have to experiment to make it lighter and crispier, but yet not bubbly or crispy like a wonton. The dough is a challenge to mix because the egg goes everywhere and you really have to use your hands to corral what amounts to quick-dry cement at first. Once you get all of the liquid mixed into the flour, you have to knead a ball of sticky goo until it is not so sticky anymore and is a completely homogeneous mass.
 Keeping the dough from being too moist while kneading or from drying out while rolling (with the little extra flour you need to prevent it becoming a permanent addition to your countertop) is the biggest challenge, since that's what ultimately determines the texture of the cooked product.
  Presuming you have managed to get the dough rolled out and cut into squares, you then place a little bit of filling in the middle of each square and fold the square into a triangle, sealing in the filling. Then, take the two outermost points of the triangle, fold them around and pinch them together. See the pictures below for what they should look like when done (like really big tortellini.)
 Now boil them in water or soup - I used the water in which I cooked the chicken since it is sort of like soup but not enough like soup to keep or eat. Typically they rise to the surface when done, but it usually takes about 20 minutes. You can always resort to the most exact method of testing done-ness: nibble on a corner - if still doughy, cook them longer. They come out looking rather limp, bland, and pale, but we'll get to that.
 If you cook them in soup you can then just eat them in soup but I prefer them fried, when they trade their anemic paleness for strength and richness and crunch. Take them out of the broth and drop them into a hot frying pan with a bunch of oil - a quarter-inch or so. (I like putting them into the fridge first as it helps them solidify and not splatter as much when you fry them.) When they're brown and crispy they're done.
Mine came out a little chewy. If I find a better dough formula I'll add it here.
At last! Mazel tov and dayenu! Eat them! With a little salt.
Shhhhhhhhhhh...... I've got a secret. Well maybe not much of one, but fun and delicious nonetheless. You know how there has been a recent proliferation of "gourmet" and "specialty" grains like millet, flax, hominy, sorghum, tapioca, brown rice, red rice, red wheat, &c? All of these grains were staples of different peoples past. Quinoa is such a grain that has recently captured my attention, both because it is supremely good for the human body and also because it is universally and flexibly tasty. It is protein-rich, gluten-free, chock-full of nutrients, and has the taste and texture of a cross between oats, orzo, and arborio rice: nutty, but fresh and clean, and rich without being heavy. It tastes like something grown. Moreover, it is cheap, sold dried in bulk, and easy to prepare.
Here's the secret equation:
1 part quinoa
2 parts water
5-7 mins covered in a microwave
=
delicious.
Mix with anything. I'm trying a quinoa-based risotto next!
If you get raw, unmilled quinoa, you might have to go through a few extra steps of preparation to remove the outer shell of mildly toxic saponins, and the leaves contain oxalic acid, the same poisonous substance in rhubarb leaves, but it is these chemicals that make it naturally pest-resistant. So if that means we work a little, so what? I'll happily carry on knowing that we will be enjoying this food (and benefitting mightily from it) for some time to come. (See Wikipedia for more info.)
August is peach season in the Pacific Northwest, so what better way to enjoy the season than to indulge in a peach pie? However, as this pie will be created for a themed potluck dinner with friends - the theme being "Endangered Species" - I am going to try some substitutions. Bear with me, as I am wont to be "punny"...
Many peach pie recipes call for a bit of lemon juice. I plan to substitute tamarind paste, which is tart and citrusy like a lemon but also has a little bit of smoke and flowers in the palate, too. While tamarind is not endangered, the Golden Lion Tamarin monkey is very much so. So I suppose you could say I was monkeying with my peach pie by adding tamarin'd.
Another recent re-discovery of mine was the deliciousness of the Okinawan sweet potato. Firt, it is purple, which is awesome. Second, it is delicious, which is awesome - rather a cross of honey, oats, and hay, with a depth and softness to the flavour that is usually lacking in regular sweet potatoes or yams unless you slow-cook them with butter. Now, the Okinawan sweet potato is [thankfully] not endangered but a certain obscure Western Madagascar Yam is so. And I will take linguistic, biological, and culinary license by equating two roots which are even different colours and live on opposite sides of the world and include them in my now-orange-and-purple pie!
Or at least I will do so this evening. Pictures to come.
I love popovers. They're tricky, myriad tips and tricks exist that claim to make them foolproof, and I'm still trying to find a recipe and technique that works for me. I just found a website that takes a super-simple approach that I'm going to try tonight, albeit with the obligatory twist.* I'll post the results.
*The twist: Line the popover tin with bacon strips and broil until crispy and then add the batter. Once done, split open the popovers and fill with scrambled eggs and feta cheese. Hehehe :-)
UPDATE:
Popovers are awesome! I tried the twist and it came out OK. The biggest problem is that the bacon has to be super crispy before you put in the batter, and the only way to do that is to cook it beforehand, in the microwave, and then bend it into the popover tin before it hardens completely. Not easy. The other thing the bacon does is disrupt the rise of the popovers, making them not so tall and airy. In the future I think I'll stick to making the popovers as a plain, or just slightly adorned poof, to be filled with delicious additions (like bacon) after they have risen to their ful and glorious heights.
As cliche as it sounds summer really is the barbeque season and by barbeque season I really mean the season in which anything and everything can be cooked over an open fire. Hyperbole? I think not. Wait until you try grilling bacon or using a fire to heat up donuts and cookies. Once again, the breakfast cereal restriction may apply, but maybe fire-roasted granola could be delicious? But I digress. Burgers are particularly common BBQ food, but the burger that I made on Sunday night was anything but common. By itself the hamburger (misleadingly named as may be) is a kind of blank slate, not because meat has no flavour (untrue) but because the taste and texture of a burger are such easily malleable characteristics. Even plain ground beef - choose your favorite kind - will taste very different if cooked in a very flat patty as opposed to a thicker wheel. And will also taste different depending on how gently, how long and over what kind of heat the meat is cooked. But then comes the fun part - what to add to the meat before cooking? I tend toward some combination of the following:
Breadcrumbs - to hold moisture
Egg - makes the burger stick together
Salt and Pepper
Onion - makes the whole thing taste a little sweeter
Olive Oil - carries other flavour through the meat
BBQ Sauce - delicious in the burger! (Pick your favorite)
Worcestershire Sauce - sweet and smoky
HP Sauce - sweet and tangy (some tamarind in it)
Hoisin Sauce - also sweet and smoky
Vinegar or Lemon Juice
Garlic
Thyme
Oregano
Ginger
Cinnamon - with beef is a very good thing, adds depth
Chili Pepper Flakes - spicy is good!
The combination of things I mix into the meat changes every time, and also changes depending on what I want to pile on the burger after it is cooked. This time I just added breadcrumbs, oil, salt, pepper, and onion because I had big plans for this burger. See, I made a large batch of pesto the previous week and had a lot left over, so I wanted to see whether a burger stuffed with pesto would be a good thing. In short, yes, but that isn't the whole story...
A hot grill in the offing is not to be sneezed at, nor wasted, so we cooked not only burgers, but chicken (slathered in pesto or BBQ sauce,) thick slabs of onions, red peppers, and sweet potatoes wrapped in foil - the last by far the most fabulous. My first attempt at sweet potatoes in a fire was on a camping trip: we wrapped them in foil, skewered them on swords, and then stuck them in the fire. They came out rich and sweet and delectable. And then I had roasted yam on a sandwich and the idea to put them on a burger was born!  The pestoburger was enormous - a feat of enginnering triumph containing four tablespoons of pesto. I had to build a bowl of meat, put in the pesto, and then seal with more meat. Cooking and flipping very carefully avoided any catastrophic explosions and then I melted a slice of goat gouda on top for good measure. The final tower also included slices of roasted sweet potato, grilled onion, and roasted peppers, all on a toasted whole wheat bun. Not bad for a casual, unprepared-for, spur-of-the-moment Sunday evening cookout. And boy was it delicious! There was a lot of sweetness from the roasted vegetables and the pesto cut that nicely, still tasting fresh and clean despite cooking inside the burger. And I could even taste a little of the nuttiness of the pine nuts. And the best part was that none of the flavours was overpowering - I could still taste the meat (there'd be no point to the burger otherwise) and the other items all stayed present. Admittedly, though, it was a little hard to get all of the flavours in one bite.
A few final comments:
1. Trader Joe's BBQ sauce is quite tasty - we tried it on other burgers and on chicken and it has good sweetness but also a spicy bite.
2. Pesto also works really well on chicken skewers - it mellows out a lot.
3. When grilling, be sure to wear appropriate clothing - I got covered with soot and splatters of all the delicious things we cooked.
SUNDAY AFTERNOON BBQ
Feed as many as you like
ROASTED SWEET POTATOES:
Wrap sweet potatoes in foil and place on the grill (avoid the hottest parts but make sure that the potatoes get a fair amount of heat.) Turn every so often. You'll know they're done when they feel very squishy through the foil. Slice as condiment or eat like a burrito or eat with a spoon. These keep very well (and get even sweeter!) if re-wrapped in new foil and refrigerated - they're easier to slice for sandwiches when cold, too.
ROASTED ONIONS AND PEPPERS:
Cut 1/2 inch thick slices of onion and slightly wider strips of pepper and skewer. Put on grill, away from hottest parts, and turn frequently until both sides of onion are yellow-brown and glistening and edges of pepper are starting to char.
PESTO CHICKEN:
Clean, slice, and skewer chicken pieces. Rub with pesto. Grill, turning frequently to avoid the pesto burning - it's best if the pesto roasts but doesn't get the full heat of the fire. (BBQ sauce is good over hot flame, though.)
BURGERS:
Are delicious! And totally unique to the cook. So have fun!

 Now that you've seen them, how do you make them, you ask? Simple: make the filling, make the dough, put the filling in the dough, boil. But as usual, easier said than done.
  Once you get all of the liquid mixed into the flour, you have to knead a ball of sticky goo until it is not so sticky anymore and is a completely homogeneous mass.
 Keeping the dough from being too moist while kneading or from drying out while rolling (with the little extra flour you need to prevent it becoming a permanent addition to your countertop) is the biggest challenge, since that's what ultimately determines the texture of the cooked product.
  Presuming you have managed to get the dough rolled out and cut into squares, you then place a little bit of filling in the middle of each square and fold the square into a triangle, sealing in the filling. Then, take the two outermost points of the triangle, fold them around and pinch them together. See the pictures below for what they should look like when done (like really big tortellini.)
 Now boil them in water or soup - I used the water in which I cooked the chicken since it is sort of like soup but not enough like soup to keep or eat. Typically they rise to the surface when done, but it usually takes about 20 minutes. You can always resort to the most exact method of testing done-ness: nibble on a corner - if still doughy, cook them longer. They come out looking rather limp, bland, and pale, but we'll get to that.
 If you cook them in soup you can then just eat them in soup but I prefer them fried, when they trade their anemic paleness for strength and richness and crunch. Take them out of the broth and drop them into a hot frying pan with a bunch of oil - a quarter-inch or so. (I like putting them into the fridge first as it helps them solidify and not splatter as much when you fry them.) When they're brown and crispy they're done.
